Introduction
During the last six years I have worked with many customers who used Jenkins as their central automation server for everything remotely related to software.
In my previous role at BTC I spent much time setting up the complex Jenkins setup for BTC internal use. This meant covering multiple programming languages (Java, Matlab, C/C++, Python) and involving complex test matrices for the supported Matlab and TargetLink versions we support. It’s not the same as developing automotive application software but a tool qualified for standards like ISO 26262 demands a high level of quality.
Personally, I’m very fond of Jenkins. But in many of the cases that I encountered, the CI setups have grown into vastly complex systems. Adaptions require experts and developers and testers are wing-clipped by strict permission settings. And instead of providing fast feedback, pipelines are painfully slow, up to the point where even over-night feedback was no longer guaranteed.
After all, it’s 2022…
Jenkins is dead!
Nietzsche
Why is Jenkins so slow and complex?
To be honest, this phenomenon is not exclusive to Jenkins but Jenkins has been around long enough to suffer most from time. Especially scm-centric tools like GitHub Actions, GitLab CI suffer much less, because they don’t aim for a central server but follow a per-repository pattern.
Apart from the fact that individual CI pipelines became more complex and involved a bigger variety of tools, the attempt to harmonize processes and bring all teams / departments on board led to a major increase of complexity.
Different teams have different needs. Applying the same process for everyone often limits the ability to create suitable solutions for individual teams. Furthermore, changes made by one person can easily break the CI setup for everyone involved. IT teams commonly prevented this by thoroughly restricting permissions and access rights. Any changes that a team wished to have, needed to be performed by central IT, creating a bottleneck, frustration and eventually acceptance of a mediocre state.
Limited benefits – high maintenance costs. That’s not really what we had hoped to accomplish, right?
What can we do about it?
We can fix this by decentralizing our IT setups, providing a controlled environment, where teams have ownership and by leveraging the benefits of scalable cloud resources.
In order to achieve this, we need to:
- Isolate applications and services by moving them into containers
- Move anything that requires manual configuration towards a configuration-as-code approach and apply coding best practices
- Replace manually prepared agent machines with dynamic agents, ideally cloud-based
- Automate pipeline creation to get rid of repetitive manual steps and lower the threshold for developers to onboard new and existing projects
This article aims to provide directions to important changes and paradigm shifts. It will not be a full step-by-step guide, but I’ll do my best to link to the plenty available resources that are out there on different aspects that we’ll touch.
My 4 Steps
Step 1 - Why I run Jenkins in Docker
The first step towards a better future for your team’s CI is to say goodbye to installing software on a PC, server or virtual machine. Even if scripts are involved, installation, runtime and maintenance of the software is affected by countless influences from its environment.
So instead of installing Jenkins on Linux, Mac or Windows, we can just run it in a Docker container:
docker run -p 8080:8080 jenkins/jenkins
This will spin up a fresh Jenkins instance on http://localhost:8080 based on the latest version of the jenkins/jenkins container image from dockerhub. This is nice, but the Jenkins instance is completely vanilla, no users, no config, no plugins. In order to change that, we can create our own Jenkins controller container image.
					FROM jenkins/jenkins:latest
# disable first-start wizard
ENV JAVA_OPTS -Djenkins.install.runSetupWizard=false
# copy plugins.txt file
COPY plugins.txt .
# add required plugins based on file
RUN jenkins-plugin-cli --plugin-file plugins.txt
The plugins.txt is just a newline separated list of plugin names and version numbers (or “latest”), for example:
- blueocean:latest
- docker-plugin:latest
- git:latest
- …
- configuration-as-code:latest
Like this, you can prepare the the set of plugins according to your needs and build it as an image with a custom tag:
docker build . -t jenkins-controller:my-custom-tag
Controlling Versions
In theory, we now have control over the Jenkins version and the plugin versions. For convenience reasons, people tend to set many versions to “latest”, both the Dockerfile (base image) and in the plugin.txt. Keep in mind that you can do this, but it means that a new build of the image can behave differently, if new versions are available.
If you want to guarantee that the image is exactly the same, freeze the version numbers and only bump them every half a year or so, in a controlled way. Luckily, evaluating different versions is trivial:
- adapt versions
- build image
- run a container and test
- if it works as expected
The part that we don’t control at this point is the configuration of our Jenkins controller. We solve this by using JCasC – Jenkins Configuration as Code.
Step 2 - Jenkins Configuration-as-Code (JCasC)
What is it good for?
The “configuration-as-code” paradigm became pretty popular in recent years. When configuring applications at runtime, you’re relying on backups in case a previous state needs to be restored. But backups usually include everything – data and configuration.
Configuration-as-Code sounds more complex than it is. Usually – and this is also the case for Jenkins – the configuration state is described in a YAML, XML or JSON file.
How to use it?
In order to use this in with Jenkins, you need the Jenkins Configuration-as-Code plugin (you can add configuration-as-code:latest to the plugins.txt, so it’s included in your custom image). By default, the plugin expects a file called jenkins.yaml in the JENKINS_HOME directory.
So how do we create this file? In case other teams in your company already use it, they may have a template for you to start from, but if not? Do we need to learn, how each of the available configuration options is described? Luckily, we don’t.
The main task of the configuration-as-code plugin is to parse the configuration file and apply the respective options but it also provides the opposite transformation step: you can use the Jenkins web UI to configure any Jenkins settings (including plugin settings) and export a jenkins.yaml that represents the current state of your Jenkins controller. Just be sure to remove any options that you don’t need or are unsure about. We want the config file to only list the things where we override the defaults. This way, the file stays readable and maintainable. Later, we will add it to a git repository.
There are a bunch of step-by-step guides available on the web. I can recommend Daniel and Kathryn’s guide on the topic.
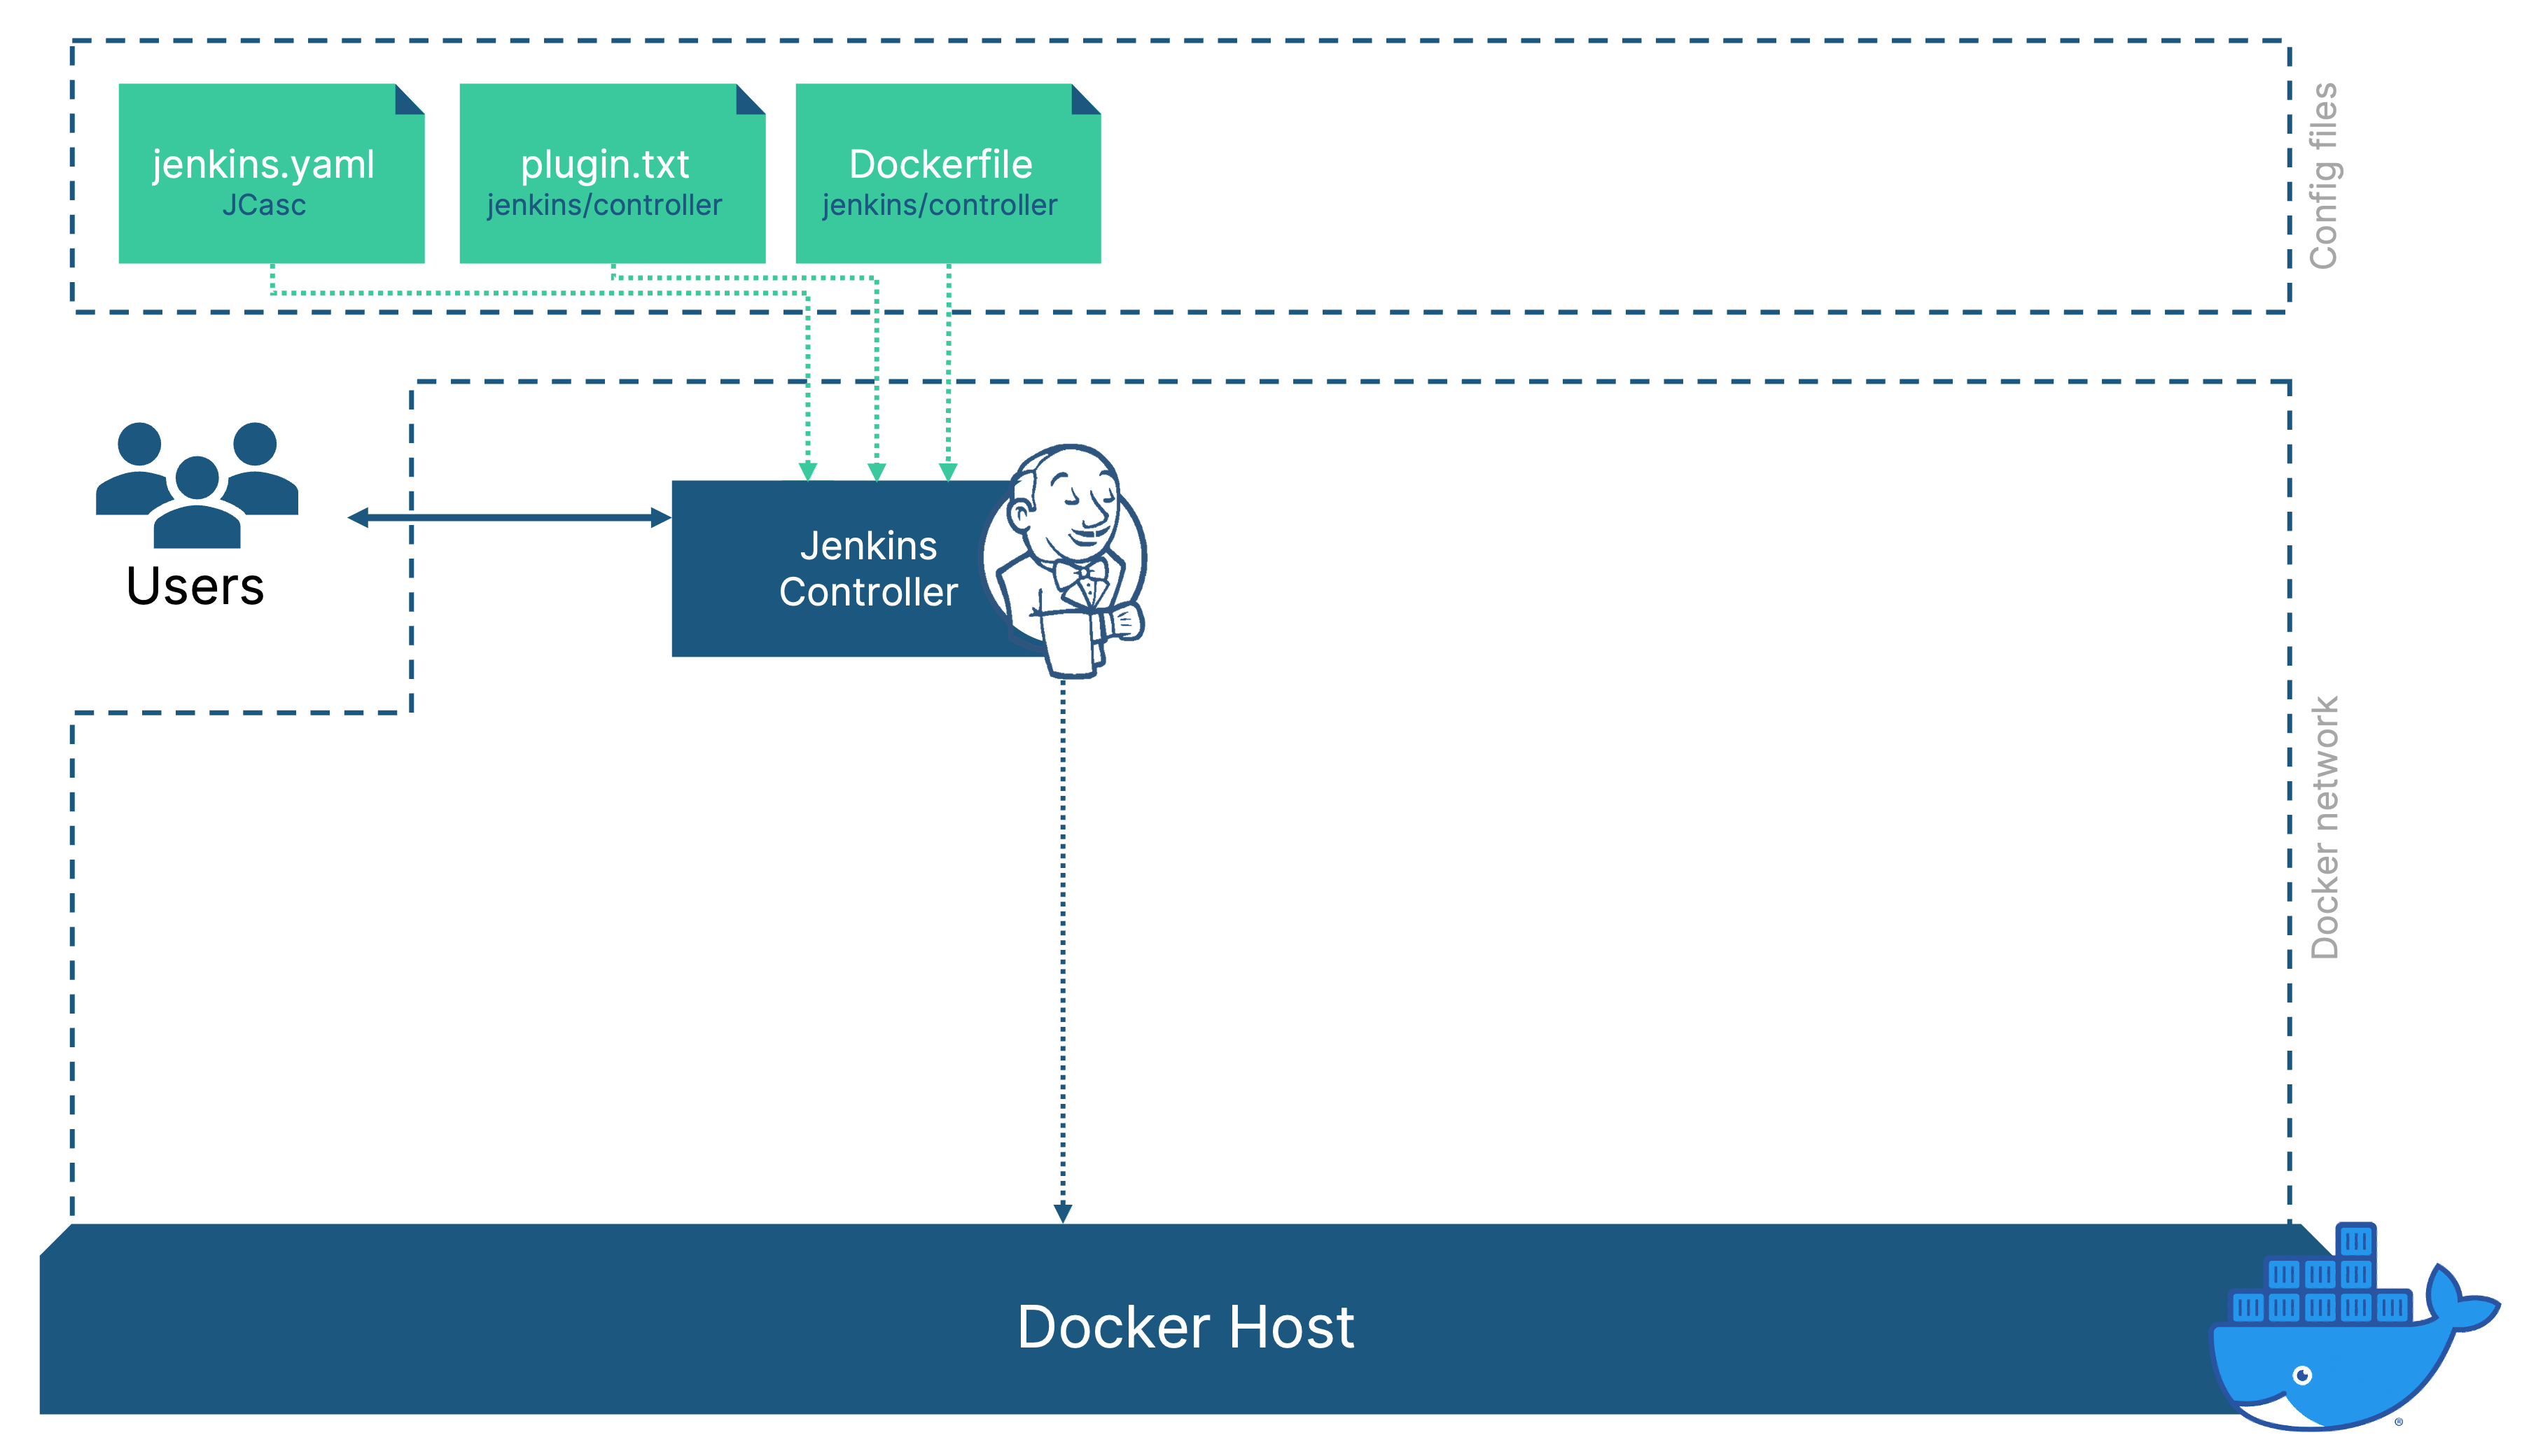
Our list of files, that controls the Jenkins controller now looks like this:
- A Dockerfile to describe how our custom Jenkins controller image is created
- A plugin.txt file that lists the plugins and versions that we want to use
- A jenkins.yaml file with the configuration options that deviate from the defaults
Step 3 - Dynamic Jenkins agents
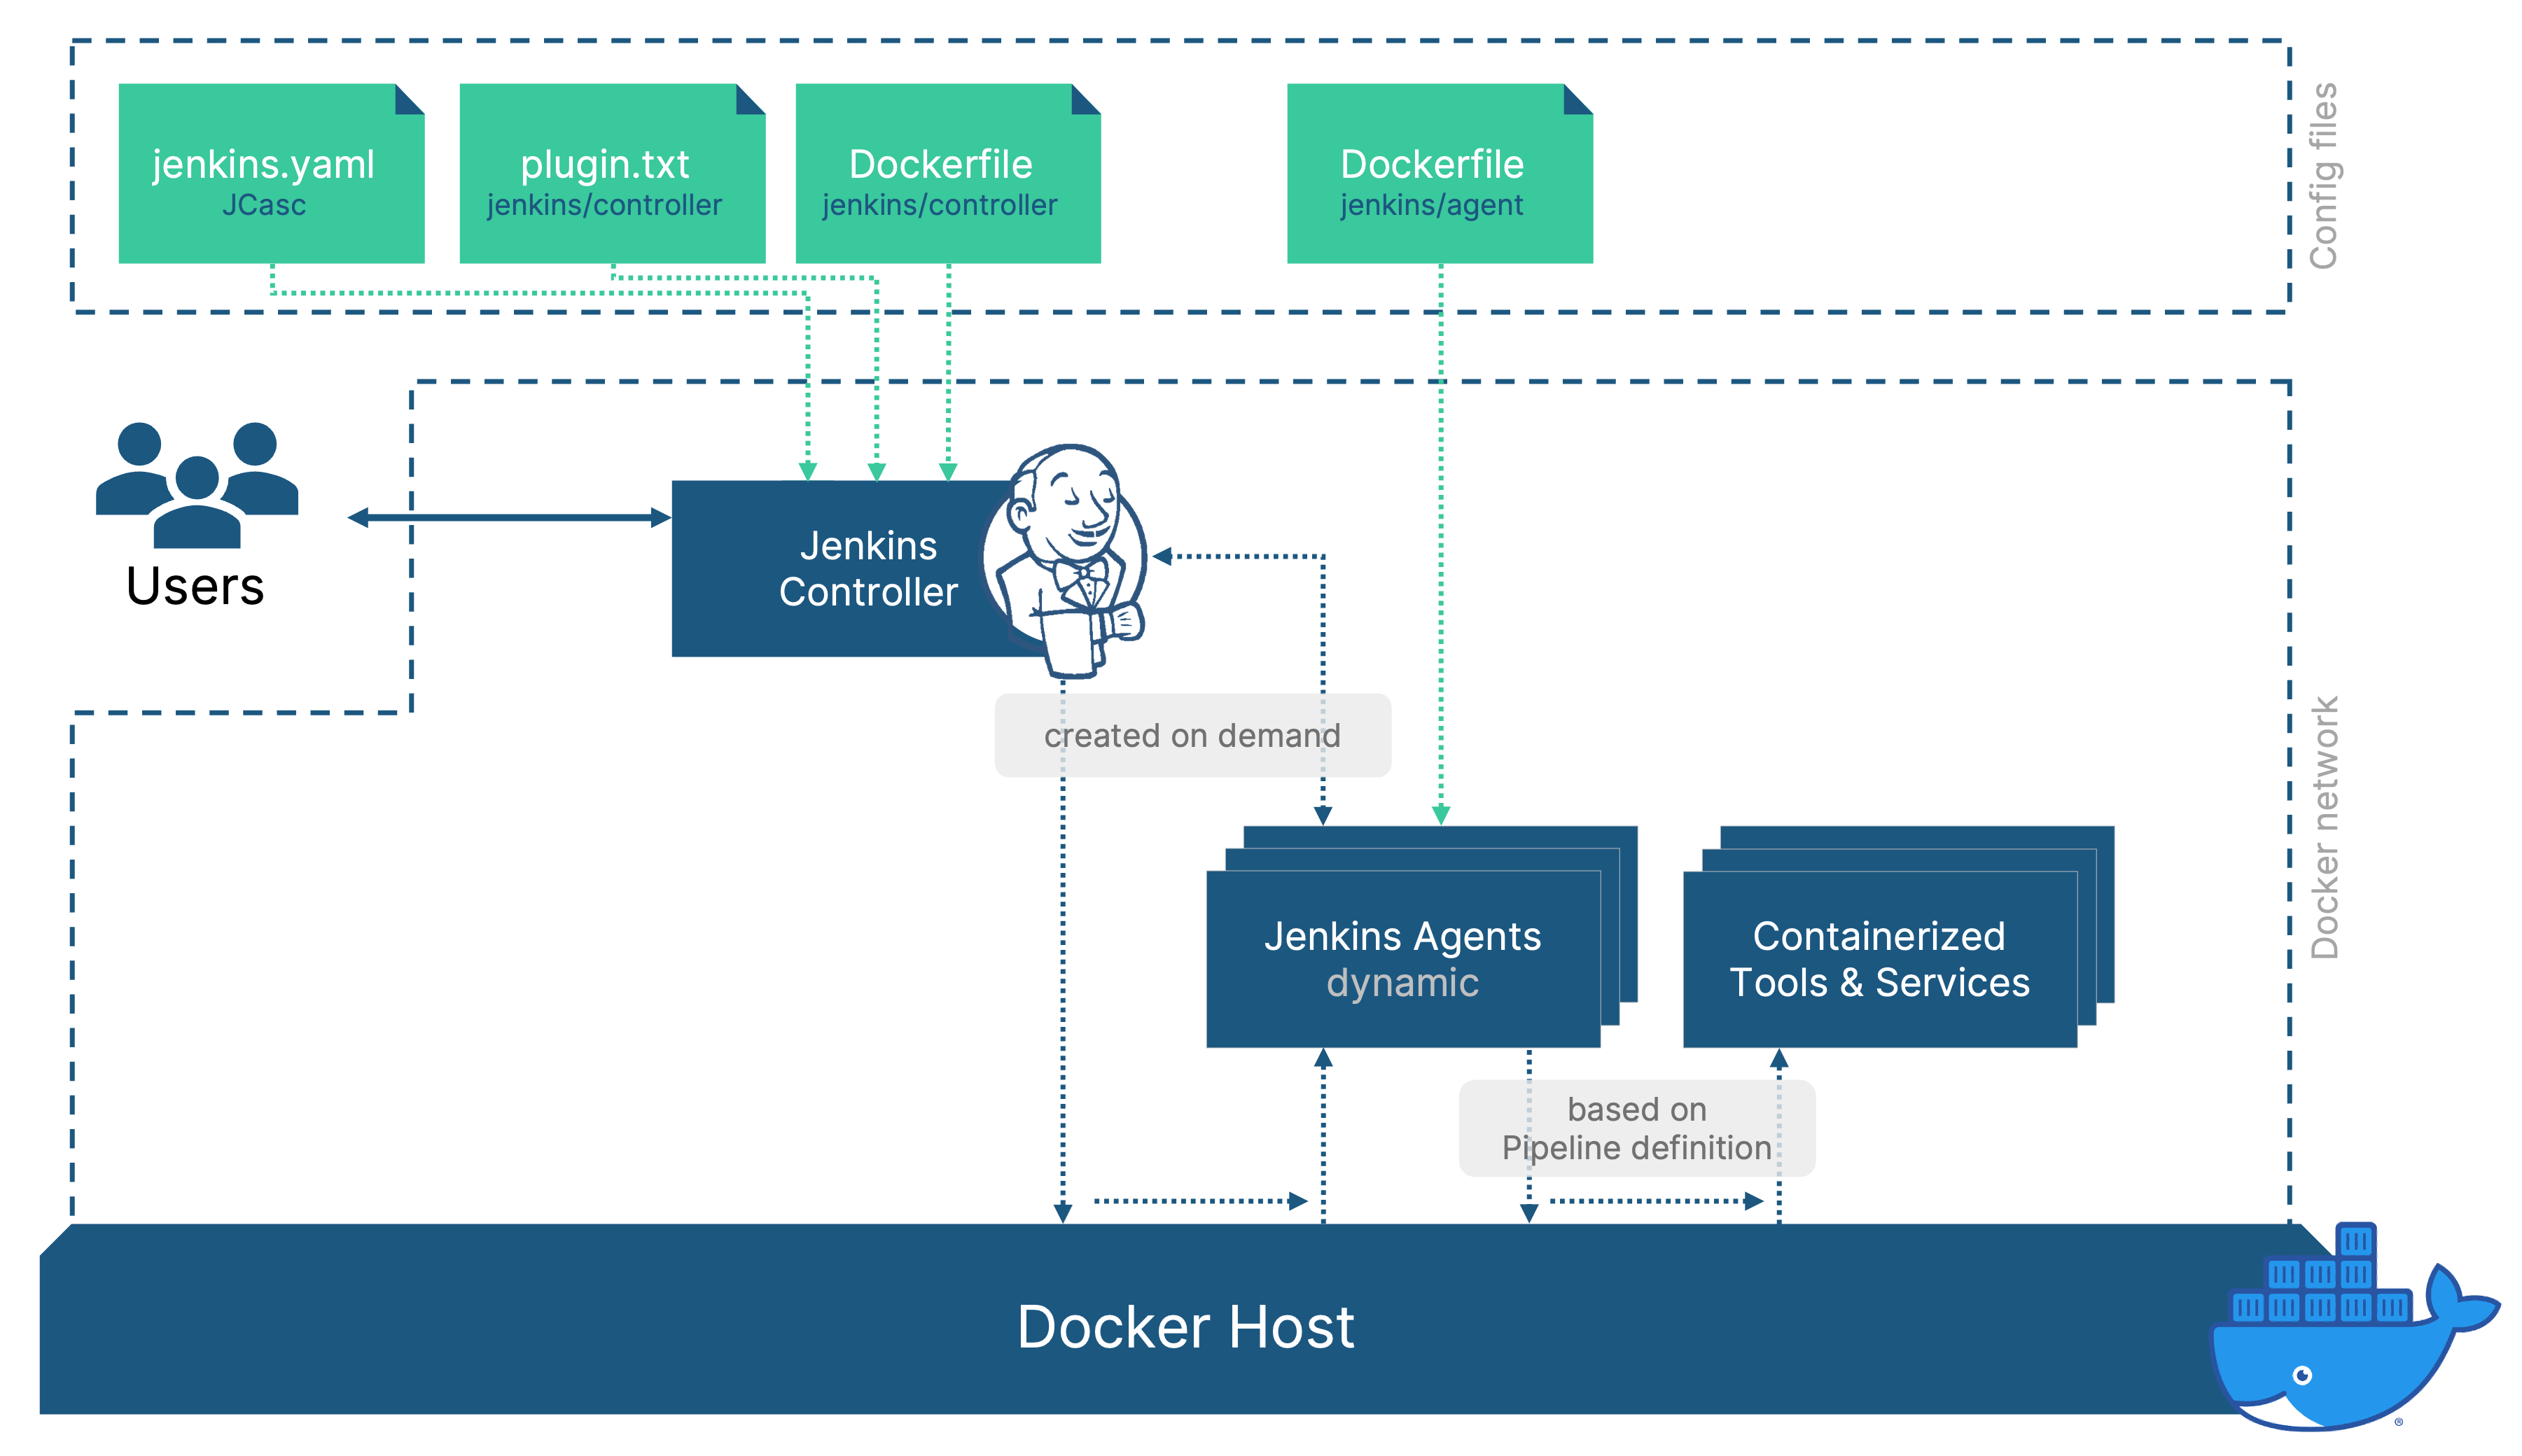
We’ve established how and why to run Jenkins in docker but the Jenkins controller is only a part of the whole picture. Any material work should not run on the Jenkins controller but should be performed by agents.
We’ve already established that we want to avoid preparing static servers / virtual machines, as they are hard to maintain and don’t scale. So why not also use docker to provide agents running in containers?
They can be created on demand and destroyed after use and ensure a reproducible state. The workload that our Jenkins setup supports can then easily scale up while the resource consumption is kept at a minimal when no jobs are running.
In order to achieve this, we need to configure a “Docker Cloud” in the “Manage nodes and clouds”-section of Jenkins (requires the docker plugin to be installed: we’ve add “docker:latest” to cover this)
- Provide connection details to access a docker host
- Option A: Make the docker socket available via network by changing the docker daemon configuration (step-by-step guide from Martín Lamas)
- Option B: Use Socat to make the docker engine available via network
- I’ve had troubles with option A on my Mac and used option B
- Prepare a docker image for jenkins agents and select it in the agent-templates section
- In order to be able to start docker containers from the dockerized Jenkins agent, I use an image that includes the docker static binary
- The Jenkins Pipeline integration for docker can then call docker commands on our dockerized agents which will use the host’s docker engine and effectively spin up the container as a sibling to the Jenkins agent container
- By adding them to the same docker network, http connections (e.g. for REST API calls) are also possible between the Jenkins agent and any sibling containers
- There’s a great step-by-step guide by Tony Tannous – in chapter 3 he explains this step-by-step
about this
- Prepare docker images with the required software
- In our domain, these are tools for model-based development code generation and test like Matlab Simulink, dSpace TargetLink and BTC EmbeddedPlatform
- Providing these images allows your Pipeline to work on naked environments, as long as they support docker containers
By configuring the Docker Cloud to be used “as much as possible”, any pipelines that we start from now on can use these dynamic agents. The relevant parts of my jenkins.yaml file now look like this:
					jenkins:
  numExecutors: 0 # disable executions on master

  clouds:
    - docker:
        dockerApi:
          dockerHost:
            uri: "tcp://192.168.19.112:2375"
        name: "docker"
        templates:
        - connector:
            attach:
              user: "root"
          dockerTemplateBase:
            image: "jenkins/agent:custom" # agent with docker cli binaries
            mounts: # access to the host's docker engine allows to mount sibling containers
            - "type=bind,source=/var/run/docker.sock,destination=/var/run/docker.sock"
            network: "jdn"
          labelString: "linux"
          name: "linux"
          remoteFs: "/home/jenkins/agent"

  tool:
    git:
      installations:
      - home: "git"
        name: "Default"

unclassified:
  location:
    url: "http://192.168.0.20:8080/"
Step 4 - Repo Discovery and Automatic Pipeline Creation
We now have a dockerized Jenkins controller, with configuration-as-code and dynamic agents that can run container defined in the pipeline (Jenkinsfile). Creating a job for a repository that contains a Jenkinsfile is pretty straight forward from this point on:
New Item > Pipeline > add Git URL > Save > Run
But what if we already have dozens of repositories and don’t want to manually manage creating the jobs for each one? For some SCM providers, you might find plugins that scan your repositories and do the job for you. However, I’ve always found this to be slightly messy, automatically creating multi-branch pipelines for all repositories.
I’ve chosen an alternative approach that works with any SCM provider that offers an API:
- Add the job-dsl plugin (add to plugins.txt)
- Create a seed job
- Create repository templates
- Query relevant repositories from the SCM server
- Create a job-dsl template for each repository
- Create a webhook for each repository to trigger the Jenkins pipeline on certain events (e.g., git push)
- Auto-Create all jobs using the job dsl plugin on the created templates
- Create repository templates
This approach relies on the Job DSL plugin, that allows to automate job creation and update for Jenkins. For further information on the general use of Job DSL, check out this tutorial from Daniel.
As mentioned above, this would work for any SCM provider / git service that offers an API to query some basic data about its repositories. I used Gogs (Go Git Service) that feels pretty similar to GitHub in many regards. I’ve implemented this for Gogs (https://github.com/thabok/gogs-repo-discovery), but the code is pretty specific and will need some adaptations to use it for another git service, different repository structures, etc.
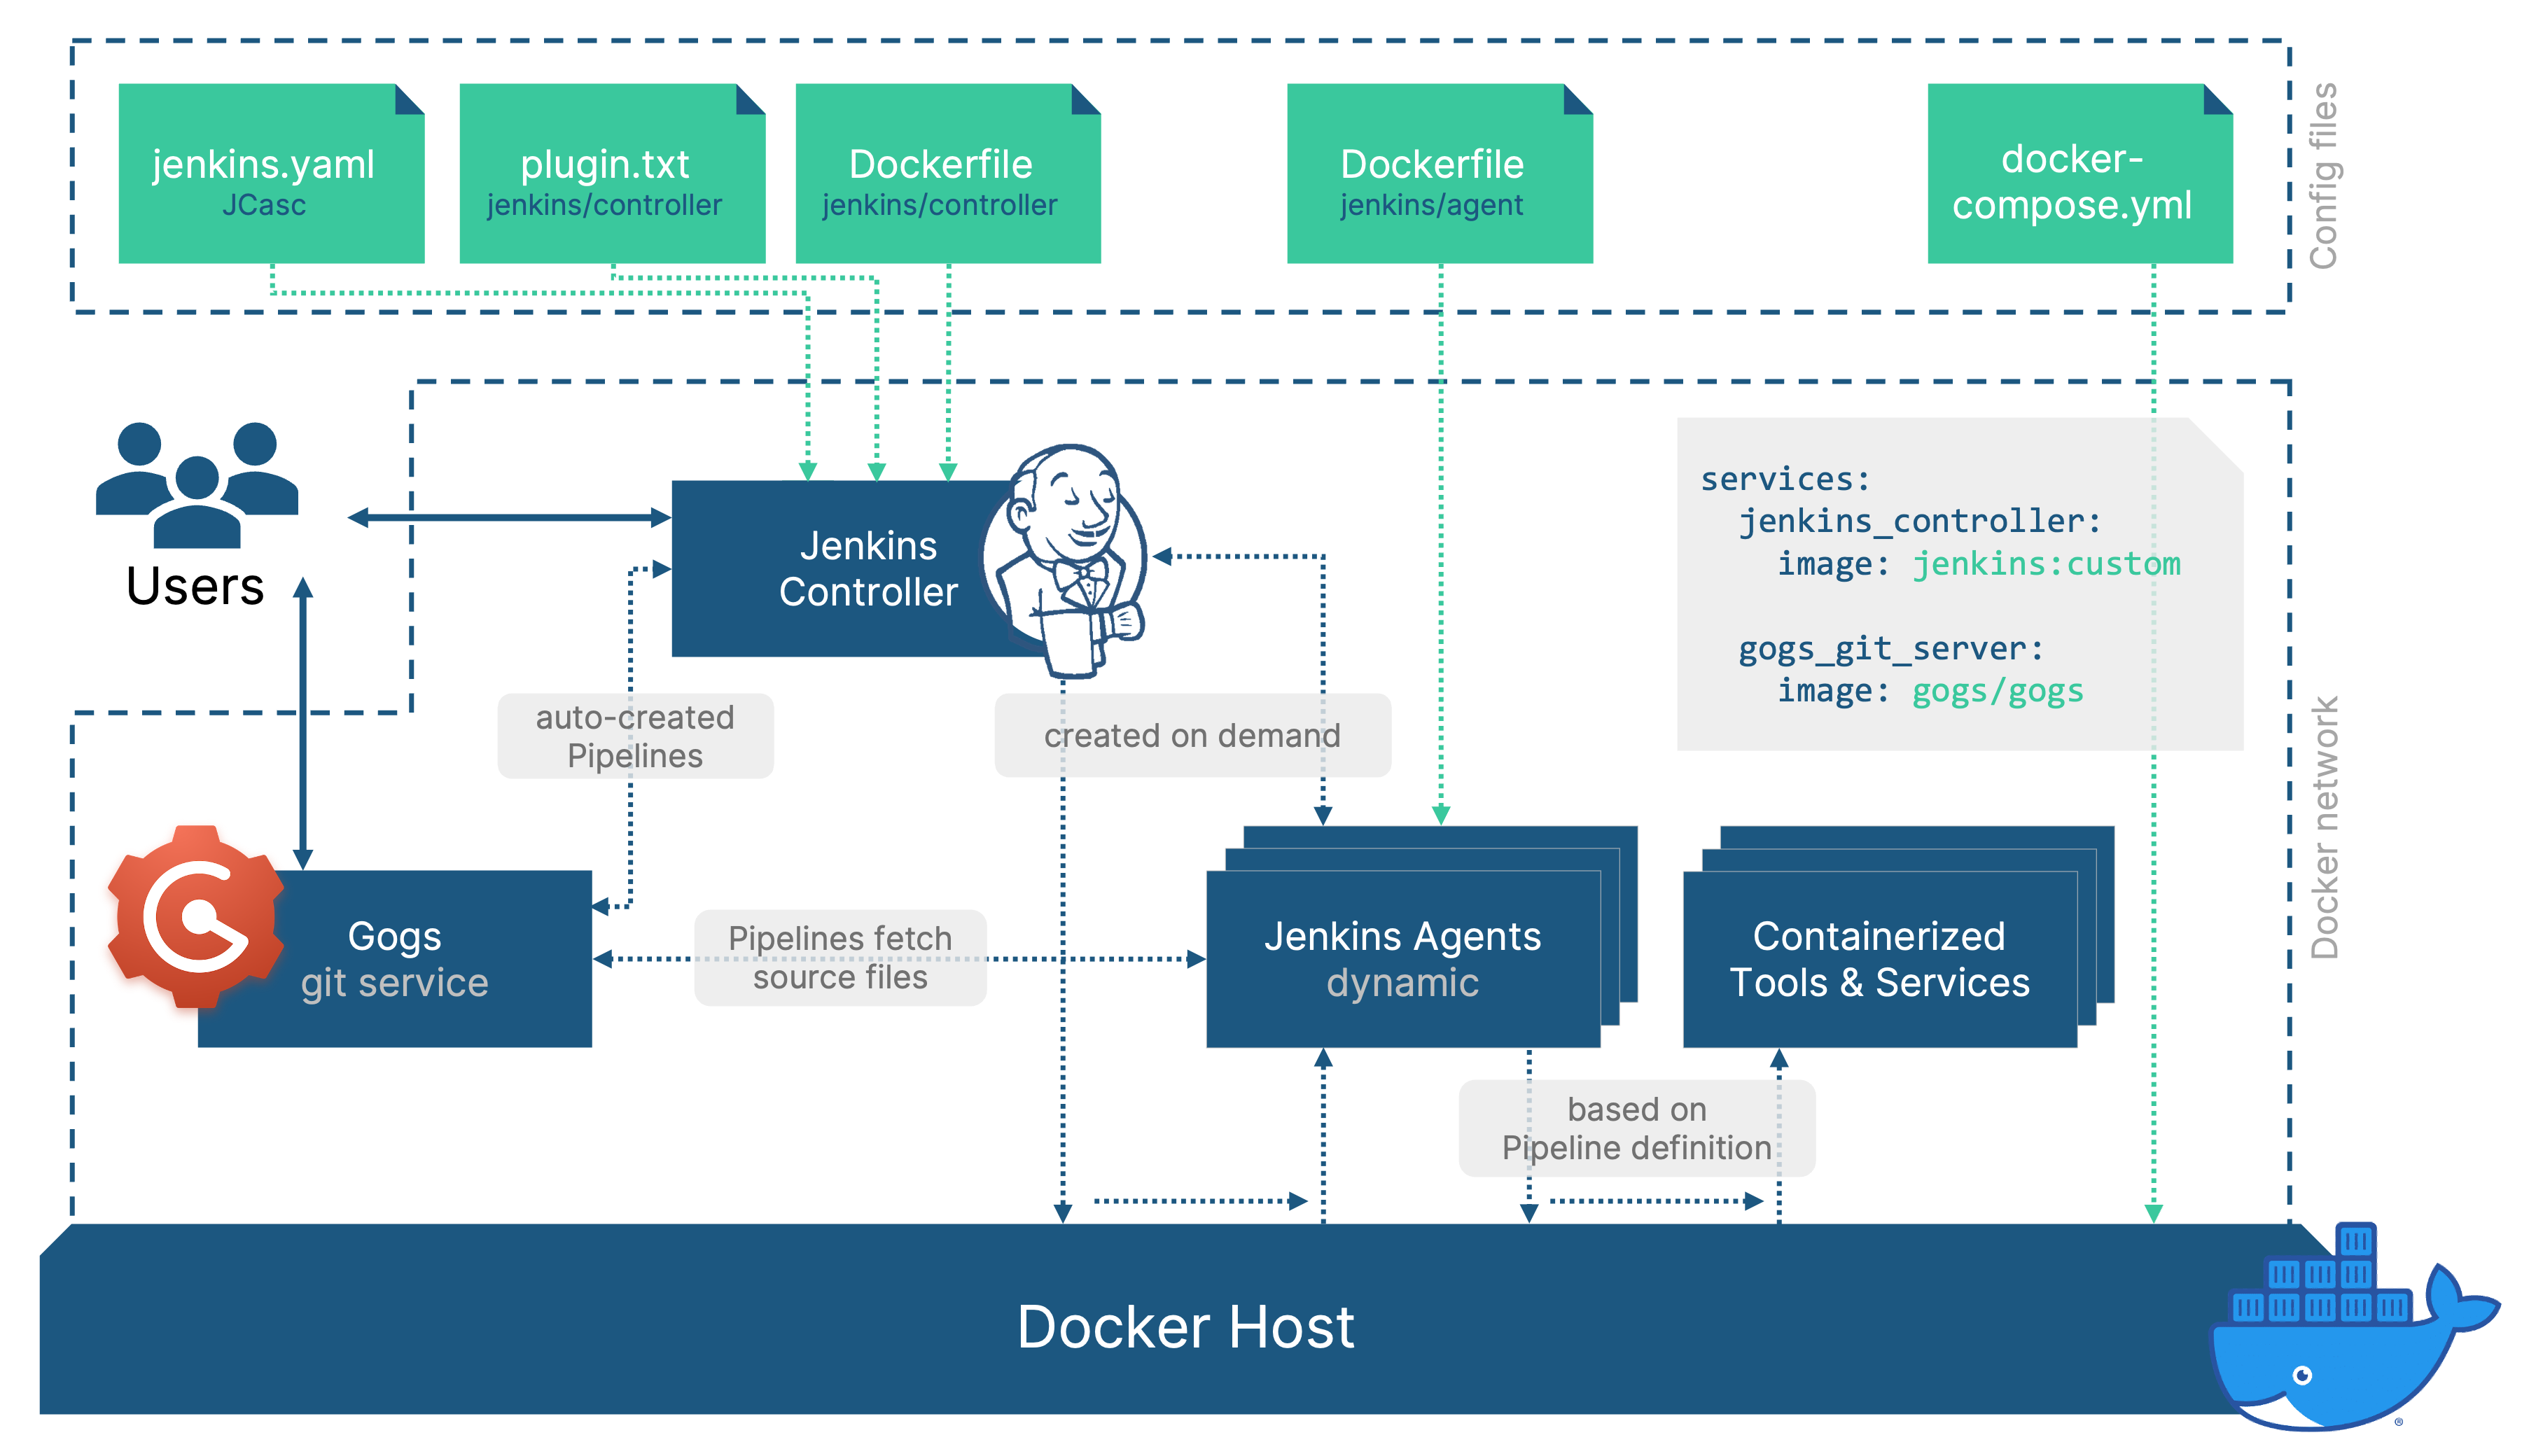
Now, in addition to the Jenkins controller container and the socat container to enable tcp access of the docker engine, Gogs was now the third container that I relied on. In order to manage the different containers, I decided to use docker-compose. This way, I can start the complete stack (jenkins + socat + gogs) with a simple docker-compose up instead of having to start three containers individually while having to remember a bunch of settings for each one:
					services:

  jenkins_controller:
    image: jenkins/controller:custom
    container_name: jenkins_controller
    volumes:
        - ./jenkins_home:/var/jenkins_home
    ports:
        - "8080:8080"
        - "50000:50000"

  socat_bridge:
    image: alpine/socat
    command: tcp-listen:2375,fork,reuseaddr unix-connect:/var/run/docker.sock
    container_name: socat_bridge
    volumes:
      - /var/run/docker.sock:/var/run/docker.sock
    ports:
      - 2375:2375

   gogs_git_server:
    image: gogs/gogs
    container_name: gogs_git_server
    volumes:
        - ./gogs/data:/data
    ports:
        - "10022:22"
        - "3000:3000"
Piecing it all together
We’ve looked into many aspects of isolating our applications in containers and applying cofiguration-as-code, all with the goal to achieve a distributed setup where teams have ownership. By removing complex environment requirements we can leverage the benefits of scalable cloud resources.
After I applied these steps to my demo setup, it now looks like this and I can finally start up everything with a simple docker-compose up:
Final comments
I’ve raised a lot of technical reasons to move applications and services into docker, apply configuration-as-code, etc. Ultimately, we want to solve a problem of having slow and unmanageable CI setups that require a lot of support from IT / infrastructure teams.
We solve it by decentralizing our CI and providing solutions per team rather than for the complete organization. This allows you to grant full control to development teams, lifting the weight off of central IT and increasing satisfaction on both sides.
By moving away from manual installations, big resource overheads that make scaling costly and setups, that require a hundred things in the environment to be perfectly prepared, we enable a shift towards team ownership. The isolated nature of containerized environments allows us to involve cloud resources for better scalability at controlled cost.
Development teams can now constantly improve their solutions, without waiting for hardware or the central IT team. Upgrading to a new version of a software tool can be done, simply by increasing the version number in the respective Dockerfile.
And finally: No – Jenkins is not dead. But the competition is modern, cloud native and is less chained by legacy projects that want to be supported. Luckily our products come with a REST API that allows to use them with any modern CI solution. I love working with Jenkins and it’s still the go-to CI solution at most of our customers, but it’s good to be prepared for a more varied CI landscape in the years to come.
Credits
My personal motivation for this article was to prepare a fully dockerized setup based on as much configuration as code as possible, to provide a flexible and recreatable environment to do demonstrations for customers. The memory of the talk “Look Ma, no Hands!” by Ewelina Wilkosz & Nicolas De Loof and Tony Tannous’ article on a local docker-based DevOps environment gave the initial spark.
Full list of references:
- Ewelina Wilkosz, Nicolas De Loof – Look Ma, no Hands!
- Tony Tannous – Setup a Jenkins Local DevOps Environment using Docker and WSL2
- Daniel Li, Kathryn Hancox – How To Automate Jenkins Setup with Docker and Jenkins Configuration as Code
- Daniel Li, Kathryn Hancox – How To Automate Jenkins Job Configuration Using Job DSL
- Martín Lamas – Using Docker Engine API securely
- Socat on Dockerhub


