- Creating our original, unified model
- Separating out our model into main module and dependency module
- Serving our dependency module through a package-manager
- Migrating our main module to use the latest version of its dependency
- Testing the main module to validate the migration didn’t break anything
Step 4: Migrating our Main Model to use the Latest Dependency
We’ve already broken up our monolithic model into a main module (our concern) and a dependency (not our concern). We’ve also established a link between the two to bring them together at run-time. But there’s one situation that we still haven’t addressed: what happens when the dep team pushes out a new feature or bugfix, that I want to make available to my own SWC? How can I upgrade my dependency version?
Let’s try this out and see what happens! If I look into shared_module_a.slx, I’ll see the following simple model:
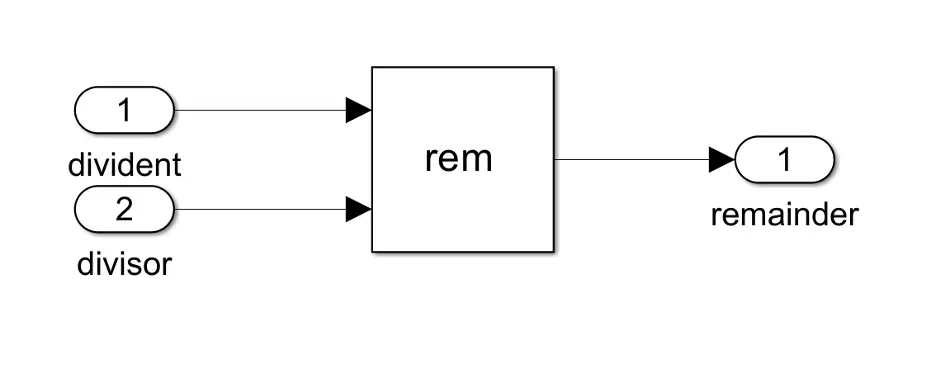
Double click on the ’rem’ function and change it to ’mod’. This will have the same functionality for our inputs, but will trigger a hash change on our model that Conan can pick up on.
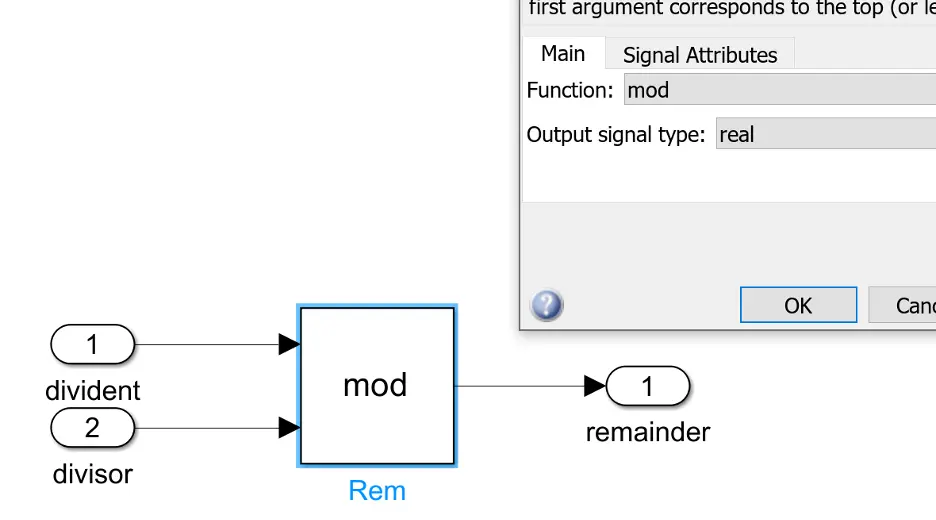
Save the model, change the version number to 1.0.1 in the conanfile, and then build and push:
conan create .
conan upload shared_module_a -r=artifactory
And you’ll see that the update has been successfully pushed to our Artifactory. Great!
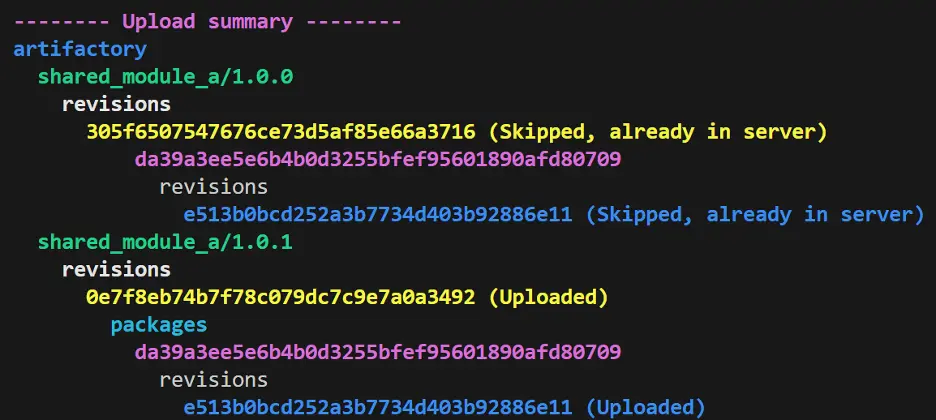
Of course, we’re assuming here that we’ve done our rigorous unit testing and development best practices that we normally would—so, at this point, our ‘public release’ of shared_modula_a version 1.0.1 represents an official release that’s intended for other people to rely on and use. So lets switch back to our SWC1, and address our question from earlier:
How can I upgrade my dependency version?
Well, you have a mouse and a keyboard, don’t you? Why not just stop being lazy, and go change your required dependency from 1.0.0 to 1.0.1?
You could, but there are good reasons to be lazy in this case. Firstly, I don’t necessarily have a way to know when the latest release of 1.0.1 came out, other than asking the developers of my dep to notify me when it comes out (and they could forget, just pushing the problem back one level). Secondly, even if I do remember (or schedule) to, say, do a once-a-week dependency check, I might not have only a single dependency—I might have several hundred, at which point I’d probably just throw my hands up in frustration and do what most developers do: leave my dependencies stuck on an old version because “it just works” and I don’t have the time to upgrade them.
No, the best way to upgrade dependencies is going to have to be automated, to get over these hurdles—and thats where GitHub and CI come in! By using GitHub actions, we can create a timed trigger, that, when run, will check the version in the conanfile, and try to increment it to the latest-and-greatest feature upgrades, and then create a new branch with a pull request for us to manually review and merge the changes.
Let’s get our files set up to automate in all the missing parts of the workflow. The first thing we’ll do is create a separate ‘scripts’ folder inside our swc1 repository, and download the update_dependencies.py and requirements.txt files from the demo repository. These will do the actual task of updating our declared dependency in our Conan file.
Of course, this script won’t do anything unless it’s invoked, and for that we need to write a yaml file to tell Github Actions what steps we want to take, and in what order. Open up your favorite editor, and create the file version_update.yml, with the following contents:
name: Version Update Check
# run regularly or on demand
on:
# schedule:
# – cron: ‚0 0 * * *‘ # at midnight
workflow_dispatch: # allow workflow to be triggered manually
jobs:
# workflow
version_update:
runs-on: self-hosted
steps:
– name: Checkout repo content
uses: actions/checkout@v3
– name: Ensure required python packages
run: pip install -r scripts/requirements.txt
shell: cmd
– name: Update dependencies
env:
GH_REPO: ${{ github.repository }}
GH_TOKEN: ${{ secrets.REPO_TOKEN }}
run: python scripts/update_dependencies.py
The language is documented extensively on GitHub’s own pages, but the gist of what’s happening here is that we’re creating a trigger-point (in our case, a manual trigger) that, when activated, checks out the repository, installs any missing dependencies, and then executes our update_dependecies.py script to perform the version upgrade and create the pull request.
Of course, we should test it to make sure it works, but there’s just a few more steps to configure GitHub so that it know what this file is and how to process it. First, we need to create a special folder, .github/workflows, and put our yml file in there. Your directory will look like this: go ahead and push it to GitHub.
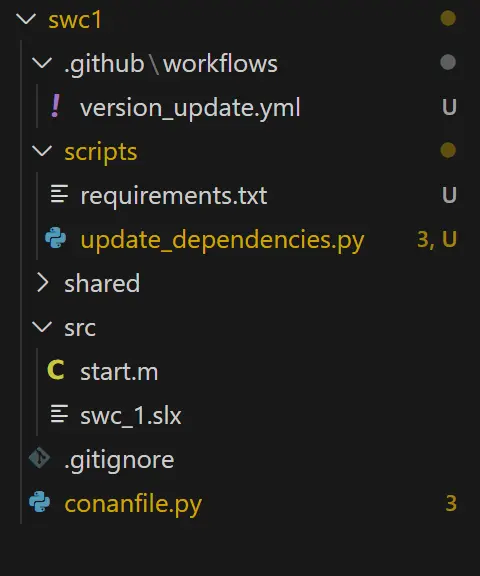
Github also needs to know where to execute this script, be that a machine you provide or on the cloud: this is called, fittingly enough, the ‘runner,’ because it runs the code you give it. GitHub hosts their own runner computers, but to have more control over the process, the workflow yaml we wrote uses a self-hosted runner. For this example, we can just use our local dev machine for a proof-of-concept: navigate to your repo, then click through to Settings > Actions > Runners. Create a new self-hosted runner, and follow the instructions to register and connect it from your PC to GitHub. Remember, unless your Artifactory server is publicly accessible, the runner is going to have to be on the same network in order to see the dependency files.
Part of our update workflow involves creating a new branch as a pull request, so that we can test our dependency migration without necessarily committing to it just yet (after all, the dependency upgrade may break out code, and we don’t want to push that to production!). This means we’ll need to give our workflow read and write permissions so that our scripts can modify the repository, specifically to enable it to create a new branch and pull request. You can find this under Settings > Actions > General:

Finally, we’ll need to give our runner permission to access our git repo (remember, this could potentially be running on a cloud computer we don’t own, so this is an important security measure). Github allows this through their “personal access tokens,” which will let our host machine push to the repo, create branches and pull requests, and in general commit changes and modifications to our software.
To do this, follow GitHub’s instructions on how to create the token; make sure to save the token! We’ll need it in a few minutes.
Then, we’ll want to store our token to a variable that our script accesses and uses to authenticate itself. Go to your settings in the repository, and under ‘Secrets and variables’ > ‘actions’, create a new repository secret. Set the value to be the token you just made in the last step, and name it REPO_TOKEN. Don’t forget to save!
Let’s test out and make sure that everything worked. Go to your repository, and under ‘Actions’, select ‘Version Upgrade,’ and run the workflow. If you see an error that running scripts is disabled on your host machine, you’ll need to change your execution policy on Windows: open up a powershell as administrator, and run
Set-ExecutionPolicy RemoteSigned
Then restart the runner and try again.
- When everything’s configured correctly you’ll see a pretty green checkmark pop up after a minute or two:

And in the top-left, you’ll see an active pull request. Success!
At this point, you can go ahead and manually perform the review by testing with the updated version…. but we’ve come so far with automation, so why not go all the way and automate away even the testing?
Step 5: Testing our Model
Even though the dependency itself has been tested before being officially released (or at least, it should be!), it’s still a good idea to perform testing on our main, integrated module, for a few reasons. First, we may find a bug that was missed in testing the dependency. It may also be that our module is relying, whether consciously or not, on ambiguous or implementation-specific behavior of its dependency, in which case even a perfectly tested dependency may break when we integrate it into our main module. Finally, at the very least, we want to validate that no interfaces have changed, and the data flow is fully integrated between our main module and the dependency it’s calling.
I’m going to be using BTC EmbeddedPlatform to do this testing, specifically by running a series of requirements-based tests and then a back-to-back test between my model and code; there are, of course, different ways to quantify what is a ‘passed’ vs ‘failed’ test, and this is only one way of defining it. But regardless of what metrics matter to our specific project, if we do a good job defining our requirements and writing rigorous test cases, then when can just auto-merge our pull request without ever needing to do a manual review!
We’re going to need to set up a few things. First, like with the dependency migration itself, we need to create our workflow yml that tells GitHub Actions what testing means to us. We’ll also need to write a script to perform the actual testing, and for this example that’s going to involve creating an .epp.
Let’s start with the CI side of things. First, going back to the main module repository, download the test.yml file under the .github/workflows directory, and place it next to the version_update.yml. You can go ahead and check out the file if you’re interested, but it’s largely the same as one from the previous step.
Next up, let’s write our testing scripts. Create a file, scripts/run_tests.py, with the following contents:
import sys
from glob import glob
from os import getcwd
from os.path import abspath, dirname
from btc_embedded import EPRestApi, util
def run_btc_test(epp_path, matlab_project_path, work_dir=getcwd()):
epp_path = abspath(epp_path)
matlab_project_path = abspath(matlab_project_path)
work_dir = dirname(epp_path)
# BTC EmbeddedPlatform API object
from btc_embedded import config
print(„##### GETTING MERGED CONFIG #####“)
print(config.get_merged_config())
ep = EPRestApi(config=config.get_merged_config())
# Load a BTC EmbeddedPlatform profile (*.epp)
ep.get(f’profiles/{epp_path}?discardCurrentProfile=true‘, message=“Loading profile“)
# Load ML Project & generate code generation
ep.put(‚architectures‘, message=“Analyzing Model & Generating Code“)
# Execute requirements-based tests
scopes = ep.get(’scopes‘)
scope_uids = [scope[‚uid‘] for scope in scopes if scope[‚architecture‘] == ‚Simulink‘]
toplevel_scope_uid = scope_uids[0]
rbt_exec_payload = {
‚UIDs‘: scope_uids,
‚data‘ : {
‚execConfigNames‘ : [ ‚SL MIL‘, ‚SIL‘ ]
}
}
response = ep.post(’scopes/test-execution-rbt‘, rbt_exec_payload, message=“Executing requirements-based tests“)
rbt_coverage = ep.get(f“scopes/{toplevel_scope_uid}/coverage-results-rbt?goal-types=MCDC“)
util.print_rbt_results(response, rbt_coverage)
# automatic test generation
vector_gen_config = { ‚pllString‘ : ‚MCDC;CA;DZ‘, ’scopeUid‘ : toplevel_scope_uid }
ep.post(‚coverage-generation‘, vector_gen_config, message=“Generating vectors“)
b2b_coverage = ep.get(f“scopes/{toplevel_scope_uid}/coverage-results-b2b?goal-types=MCDC“)
# B2B SL MIL vs. SIL
response = ep.post(f“scopes/{toplevel_scope_uid}/b2b“, { ‚refMode‘: ‚SL MIL‘, ‚compMode‘: ‚SIL‘ }, message=“Executing B2B test“)
util.print_b2b_results(response, b2b_coverage)
# Create project report
report = ep.post(f“scopes/{toplevel_scope_uid}/project-report?“, message=“Creating test report“)
# export project report to a file called ‚report.html‘
ep.post(f“reports/{report[‚uid‘]}“, { ‚exportPath‘: work_dir, ’newName‘: ‚test_report‘ })
# Save *.epp
ep.put(‚profiles‘, { ‚path‘: epp_path }, message=“Saving profile“)
print(‚Finished btc test workflow.‘)
# if the script is called directly: expect
# – the first argument to be the epp path
# – the sedocnd argument to be the ml project path
if __name__ == ‚__main__‘:
run_btc_test(sys.argv[1], sys.argv[2])
# run_btc_test(‚test/swc_1.epp‘, ’swc_1.prj‘)
This file has a lot of EP-specific code, which is well documented on our Github, but the gist of what it’s doing is invoking the EP REST API to open up our profile, run our tests, and create a project report. Going into the particular details is beyond the scope of this tutorial, but if you’re interested you can always reach out for more info.
One final thing EP needs to run over CI is a config file, to tell it what version of EP to run, what version of Matlab is integrated, and where our license server exists. Create the file scripts/btc_project_config.yml, with the following text:
epVersion: 23.3p0
#licenseLocation: 27000@localhost
preferences:
GENERAL_MATLAB_CUSTOM_VERSION: MATLAB R2022b (64-bit)
GENERAL_COMPILER_SETTING: MinGW64 (64bit)
Adjusting the preferences depending on your particular environment values.
Creating an EP Profile and Putting It All Together
One more step to set up our testing! EP provides a persistent environment to store test cases and simulation results, and we need to create this profile so that we have a context for our tests to execute in, that our testing script can simply point to. To create this, open up Matlab and EP. Make sure to (temporarily) add in the dependency, shared_module_a.slx, to your path, so that we can generate code from our module. Go ahead and select a new ‘EmbeddedCoder’ type profile, and point it to swc1:
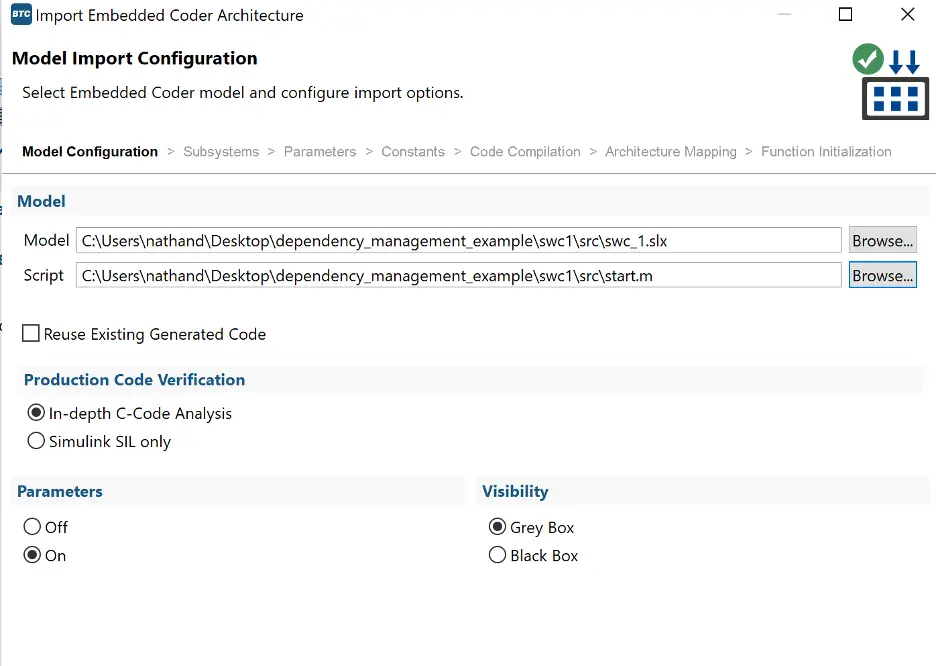
Click through the dialogue, adjusting any settings as needed. When everything looks good, press ’import’. For the sake of completion, create an empty requirements-based test case, and then save the profile as swc_1.epp inside the test folder, and push it to git.
Once again: go ahead and trigger the workflow manually:
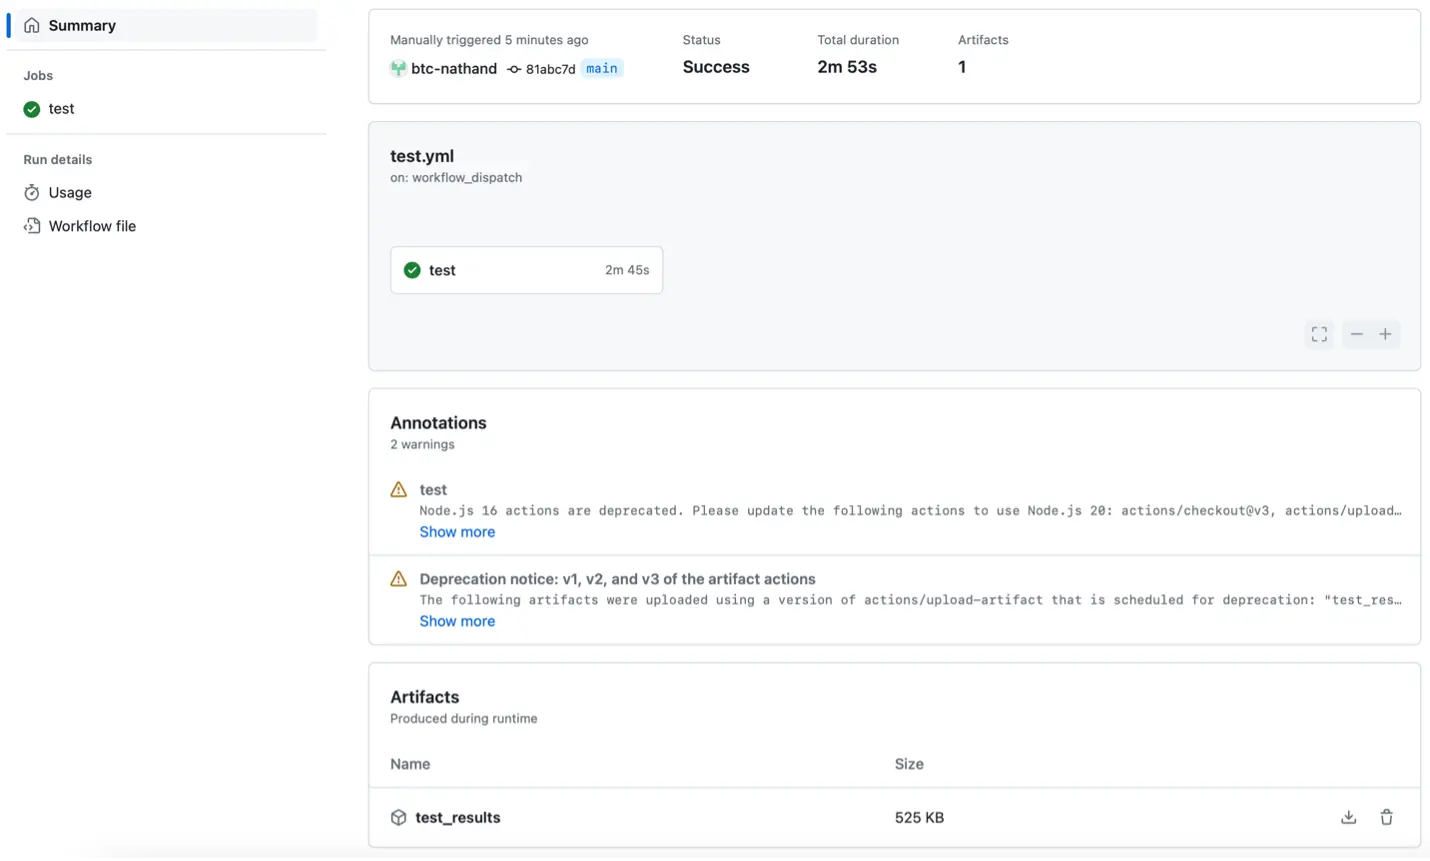
Success! We can even see our test results, bundled up in a nice little HTML under our ‘artifacts.’ This shows us that all of our test cases passed, and we can see a detailed breakdown of any discrepancies if we were to detect any failures.
Summary
Phew! That was a lot! We went from an empty repository to a fully-fledged CI pipeline, in just a few hours. To summarize everything we did:
- We created a Simulink project and separated it out into its main constituent and its dependency. These are versioned, developed, and served separately!
- We set up an Artifactory server where our dependency can push/upload newer releases of itself, for consumption by the main constituent.
- We configured a conanfile for both main and dependent components, to allow them to either release a public-facing version, or download said version as a dependency.
- We created a CI script to automatically check for dependency version updates and create a new branch and pull-request with the updated dependency version, if we detect one.
- We created a similar CI script to run unit-testing which validates the results of migrating our software, to confirm that the dependency migration hasn’t broken our main module functionality.
The only thing we haven’t done is connect the last two steps, to merge our pull request automatically if it passes. Well, that, and push our pipeline to a production setting; I’ll leave that as an exercise for the reader
Thank you for joining me! Until next time!


